How is it possible that week TWO of this seasons Project Quilting is already here? The one thing these challenges do is make these long winter months fly by a little faster and for that I am very grateful.
Sunday when the challenge came out I was busy most of the day and didn't get a chance to read what our challenge was going to be until that evening, and someone already had a project done and posted! I am amazed by all of the people who can think that fast, and then actually get something done. I decided maybe if I pushed myself I could get mine done by at least Wednesday.
This weeks challenge is "In Silhouette" as soon as I saw that I thought of my last weeks project, it would have been perfect.

One of the things I love most about the challenges, is reading Kim and Trish's blog postings on the Persimon Dreams Blog at kimlapacek.com - the time and thought put into creating each of these challenges is amazing. I usually have to read the blog post two or three times just to get my brain working and get some inspiration for the week. In the challenge this week all we had to do was incorporate a silhouette into our design, other than that the sky was the limit.
I was really excited when Trish mentioned German Scherenschnitte as an example, because a number of years ago I really got into Scherenschnitte and did all kinds of fun paper cutting designs, I am sure if I dig deep enough in my mess I would still have some of them, but I don't even want to dig very deep into my fabric stash because then I have to pick it all up, so I certainly wasn't going to go looking for inspiration in piles of papers.
I decided it would be fun to do something that resembled a scherenschnitte design, and thought of a photo I took a few years ago when the goats got on the back deck. I started on Sunday night and about half way through just didn't feel the inspiration so I threw it away. Back to the drawing board.


I had a quilt to bind on Monday so while I was upstairs sewing I dumped out my batik tote and started looking for inspiration. One of the ideas Trish also mentioned in her blog post was Mexican Papal Picado. I love bright colored flags, especially Prayer Flags and Paper Picado, something about those little flags just make my heart happy.

I decided that somehow I wanted create a little Día de Los Muertos scene with tiny paper flags as my silhouette.
A little history about Día de los Muertos, this is a Mexican holiday where families welcome back their deceased relatives for a brief reunion that includes food, drink and celebration. The holiday is celebrated from Halloween on October 31 through All Saints Day November 1st & All Souls Day on November 2nd. Little alters called Ofrendas are prepared to honor loved ones who have passed away, symbols of the four elements: water, fire, earth and wind are used on the alters, as are other items such as photos of the deceased, salt, cempasuchil (marigold flowers) and bread. Each item represents something significant to the celebration.
The little Papel Picado Flags (which basically means chopped paper), represents the wind element. The holes in the paper are a way for souls to travel through to make their visit back to earth.
The candles that are lit represent the fire element, these candles are used to light a path to guide the spirits home.
The bright orange marigolds are used because their strong fragrance is believed to attract spirits to the alter, and their orange color is associated with the feeling of celebrating life, instead of the sadness associated with death.
An idea was forming as I sewed & dug through fabric, all I needed was the right fabric to make it work. I found a little 3" x 6" scrap of purple fabric that made me think of the night sky. Surely there was more than mere inches of this fabric somewhere, why would I only have a scrap. Who saves tiny scraps of fabric?


I found a bright gold & orange batik that had swirls like glow of candles, not only were the swirls perfect, but the color was exactly like the marigolds. The crazy thing was it was also only about 6 inches wide so it fit the purple just right. Now all I needed was something to make my silhouette with and I was in business, I didn't have a solid black but I did find a strip of dark blue, I also found a fun purple and orange piece that had little patterns that were like the cutouts on the papal picado.

I sewed the purple sky & the swirled gold fabrics together, trimmed them up a bit, then cut the edge of a swirled piece and used wonder under to iron it down to the top where the gold met the purple. I then used the dark blue to create my silhouettes of candles and ironed them down to the bottom of the gold, I zig zagged around them and created little wicks using black thread.

I then quilted the candle glows with gold thread and used the purple/orange batik as my backing fabric, border and binding. Then the fun part began, I used gold sequins and orange beads to create the candle flames. I have all thumbs when trying to do things like hand sewing or beadwork, so this part of the whole project took the longest to create. It was probably a good thing I never found a larger piece of that purple!

The next step was to create my paper flags. I thought seriously about using paper since I knew it would cut neater, but I knew that all I had for tissue paper in my house was red, green, gold or white leftovers from Christmas. So I dug back into the fabric until I found some tightly woven batiks in bright colors and not too much design and very carefully snipped out some tiny flags.


Originally I was going to use a black pen and draw designs, but I knew I wanted them to be authentic and for you to be able to see the candles behind them. When the flags were done, I stitched them to a cord, ironed them good and stiff and then strung them onto my quilt.

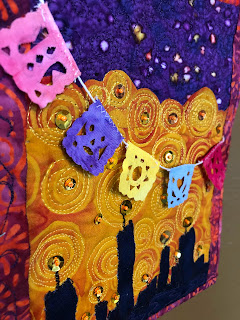
I was done...before noon on Tuesday! My little quilt is 7 X 9 and as you can see my flags are the size of postage stamps. I don't like my silhouette candles, I think I could have put a bit more effort into making them look more like candles and less like a city scape, but overall I am happy with the way it turned out.


Really cool! I love the paper flags!
ReplyDeleteThank you! I really had fun making this project!
DeleteSuper cute PQ 13.2 entry! Thanks for sharing your process. LOVE that you used some of your smallest scraps to make this piece!
ReplyDeleteThank you!
DeleteSo many fabulous details to enjoy in your finished piece, especially those little paper flags!!
ReplyDeleteThank you! I think the flags were my favorite and I might need to make more of them for future projects!
DeleteThis is so sweet! Love all the details you put into it!
ReplyDeleteThank you, every once in a great while I have a favorite project from the season and so far I would have to say this is one of them, I had so much fun making it!
ReplyDelete