Saturday, March 23, 2019

Project Quilting Challenge 10.6

It's hard to believe that we are already at the end of the 2019 Project Quilting season, and this past week we had our final challenge. This time around it was a pretty sweet challenge :) the theme for the challenge was "Craving Chocolate".  I am pretty sure this household wasn't the only one who munched chocolates to get inspired this week! LOL


I knew right away what I wanted to create, but I really wasn't sure how I was going to do it. Years ago I saw an advertisement for chocolate diamonds & I WANTED one! My birthstone is the diamond & brown is one of my favorite colors, so what better than a brown diamond? Of course I always say there is a "want" and a "need" list, just because I want something doesn't mean I need it, fabric often falls into that and usually the NEED wins. But I really don't need a chocolate diamond, so I decided since I wasn't going to buy one & I am pretty sure no one else is going to buy one for me, I would make myself one.

After thinking about different fabrics I could use to pull this off, knowing I wanted sparkle, I knew there was no way I could come up with sparkly fabric in one week when the nearest fabric store is 150 miles away, and ordering fabric wasn't going to get it here on time.  I decided to try and make it out of chocolate wrappers, of course I didn't take into consideration that most of the chocolates in the stores right now are wrapped in pastel foils for Easter.

Now while I have to admit brown is a favorite color, chocolate really isn't my favorite candy, give me peppermint over chocolate any day. So in order to pull off this chocolate challenge I knew I needed to put Ron to work eating chocolates for me, I ate my fare share, but he took it for the team & consumed more chocolate than any human should in one week! LOL We won't be buying chocolates for awhile.


I found a picture of a chocolate diamond and printed it so I would have something to sort of follow, then I actually found printable coloring book sheets online of jewels & I was able to trace a diamond shape onto fabric so I would have a template.


I discovered that foil candy wrappers don't glue very well, and some of the more expensive candy didn't want to glue at all. After cutting all the little facets and sticking them down I knew I needed to do something to keep them down, I tried putting brown tulle over them, but didn't like the way it looked so I trimmed it around the diamond and decided to just use metallic gold thread and quilt the wrappers down. Then I quilted the outline of the facets, hoping that would give it a diamond look.


It really sparkled before I did the quilting, but I had to do the quilting to make it a quilt challenge & to hold down the wrappers. I found a fun little piece of fabric I used on the back that says I love you s'more, which made me long for summer campfires!  I thought of the song "Diamonds are a Girl's Best Friend" while I was working & decided to name my quilt "Chocolates Are A Girl's Best Friend"
It was a fun little challenge to end the season. My quilt is 8 x 8 and fits nicely in my little quilted box with all the other quilts from this seasons challenges.


Saturday, March 9, 2019

Project Quilting Challenge 10.5 Abecedarius

This weeks Project Quilting Challenge 10.5 is based on the word Abecedarius, which basically means "an alphabet primer" examples include using the first letter of a word to write a poem or A is for Apple, B is for ball. So our project needed to be about the alphabet in some form or another.


As soon as the challenge was announced I knew I wanted to do something that incorporated a vintage set of rubber stamps we have. They are from the Lone Tree School House in Ziebach County SD.  The school house sits in one of our pastures and for many years after it was no longer used as a school, it was used as a  storage bin for cattle feed, that is until the rattlesnakes, pack rats & mice took it over. Now according to our grandsons it houses ghosts, vampires, and witches. Oh my!


The stamp set is starting to fall apart & some of the letters are missing, but we have had fun using them for different projects over the years, including using them to make invitations for one of our daughters weddings.


I was out of town until Tuesday, then had a project deadline that I needed to have done by Friday, so I put off my little quilt challenge until Friday night. I knew what I wanted to do and I just needed to figure out how I was going to do it. I dug out fabrics on Friday & then waited until Saturday afternoon to start putting things together.

I love old keys, mysteries, and secret hiding places,  the old Alphabet stamps for some reason remind me of Agatha Christie books, I think they look like the letters in ransom notes. I thought it would be fun to do something that made one think of mystery, treasures, and secret hiding places.

Since it was an alphabet challenge I wanted to use fabric that had words on it. This is not something I have a lot of in my stash. I did find a piece of fabric that looks like lined paper with writing on it, sort of like it's from old feed store receipts or ledger books. I also had a piece of fabric that has the alphabet on it in different fonts which I decided to use on the back of the quilt. Because I wanted to print on the fabric with the old rubber stamps I knew I needed a plain piece of fabric that the letters would stand out on. I found a piece of cream colored cotton that matched my ledger fabric and decided to use brown ink to stamp with.


I wanted to create a little door with a hidden place to put an old key.  I knew somewhere in my junk I had a key I bought in a bargain bin, of course it was  brighter than I wanted & had jewels on it,  so I painted it to make it look old & not something from the Arabian Nights.

Then what to stamp? One of the stamps in the set is an "ONLY" stamp, I have always wondered what they used it for since it's the one complete word in the set, everything else is a letter, number or symbol and the fun little pointy hand stamp. I knew I wanted to use the Only & The Hand!
I came up with a little saying that fit my secret door idea,

S is for Secret
K is for Key
H is for Hidden
ONLY for me!


Of course since I made the quilt first and then stamped it, I didn't plan enough room for all my words, and had to scrap the word hidden, but then I was able to use the "&" symbol and I love that almost as much as the pointy hand!

I quilted the main part of the quilt to look like lined paper, then added another layer of batting to make the space for the key deeper. I first sewed the key on but didn't like the way the threads looked so I glued it instead. I made a little door to hide the key behind, using heavy interfacing in-between the layers of fabric. The finished quilt is 9 x 12.


Now that I have it done & I know I won't be able to get next door to quilt tomorrow because of the snow, I'm thinking I might need to find a good mystery book to read!

This picture is from an old book my friend Kim has which is from the Lone Tree School....I am sure that is supposed to be the snowman's arm, but I like to think it is a picture of a poor snowman who has been stabbed by someone who is just sick and tired of all this crazy snow! LOL


Saturday, February 23, 2019

10.4 Pixel Play

This week our Project Quilting Challenge was Pixel Play. We were to create a quilt using Pixels as our inspiration. For those who don’t know what a pixel is, here is a simple explanation I found online- 

The term “pixel” is actually short for “picture element”,  small little dots are what make up the images on computer displays, whether they are flat-screen (LCD) or tube (CRT) monitors. The screen is divided up into a matrix of thousands or even millions of pixels. Typically,you cannot see the individual pixels, because they are so small. This is a good thing, because most people prefer to look at smooth, clear images rather than blocky, "pixelated" ones. However, if you set your monitor to a low resolution, such as 640x480 and look closely at your screen, you will may be able to see the individual pixels. As you may have guessed, a resolution of 640x480 is comprised of a matrix of 640 by 480 pixels, or 307,200 in all. That's a lot of little dots.
Each pixel can only be one color at a time. However, since they are so small, pixels often blend together to form various shades and blends of colors. The number of colors each pixel can be is determined by the number of bits used to represent it. For example, 8-bit color allows for 2 to the 8th, or 256 colors to be displayed. At this color depth, you may be able to see "graininess," or spotted colors when one color blends to another. However, at 16, 24, and 32-bit color depths, the color blending is smooth and, unless you have some kind of extra-sensory vision capability, you should not see any graininess.

I downloaded a couple of apps one that would take a photo and make a pixel pattern & one you could draw your own pixel pattern on . I also found a site where you could upload a photo and it would create a cross stitch pattern from your photo, it gave you exactly how many stitches there were & the colors you would need. When they announced Pixel Play as the theme, I was really excited because sewing with only squares is so easy, but when I started taking photos & uploading them to create pixel patterns I realized that it would take a lot of squares to make a quilt, some of the patterns I created had more than 3000!
I was pretty positive I needed to figure out something with about 2900 less squares. 


This was a photo I took of a small white butter plate with a round white rock in it. 
When I was looking for ideas to pixilate my quilt this week, I came across another interesting article & definition- 

Pixilation, spelled with a second i, is a filmmaking technique that dates to the beginnings of cinema, in which live actors are posed frame by frame and photographed to create stop-motion animation. An archaic British word meaning "possession by spirits (pixies)", the term has been used to describe the animation process since the early 1950s. 

Of course the word Pixie caught my eye and I thought about little pixie houses made of mushrooms, I decided I wanted to create a little Pixel Play- Pixie Play House! LOL


I found some fun mushroom photos & 
some vintage mushroom houses, after pixelating them I realized I needed to scale things down, I didn't have time this week to sew 500 squares together & if I wanted to complete the challenge it would going to have to be a whole lot smaller! 

I drew out a graph & a sort of mushroom shape then started digging through fabric for ideas. I came across one of my favorite pieces of batik that is a checkerboard design and I got the brilliant idea to incorporate “pixel” looking fabrics, I was surprised I had as many fabrics as I did with little squares in them. I used the green to give the background that dappled shadow look of leaves in the sun. I didn’t have much red & white fabric but I did find a batik that looked sort of mushroom cap red speckled. 


I made my squares 1 inch and then wished I had used bigger squares or fused them instead of sewing them. My seams were not very matching, but I was happy with the way it turned out. We had more snow this week & the bright colors make me long for spring & fishing in the warmth of the sun! I remembered I had some little fishing buttons so I added one little “gone fishing” sign, while I was digging in the button tin I also found a tiny little pixel shaped button I used for my door knob. 


I did a random quilting job, the finished quilt is only 8 x 10 so it didn't make sense to put it on my longarm machine. Doing smaller projects on my sewing machine is good practice, but I will admit I am spoiled by the longarm, it's so much easier to move the machine around & draw than it is to move fabric around.  I appliquéd a couple of leaves to the quilt just to add some depth and make it look like the tiny house it is supposed to be. Then I bound it with that crazy black & cream checkerboard fabric. 


It was a fun challenge & I'm really excited about the pixel apps I downloaded, someday when I’m feeling really ambitious I might have to attempt some bigger pixelated projects! 

The whole country had snow dumped on it again this past week, & I almost did a snow pixel picture, but thought maybe that would be cheating since basically it would be one big white square! LOL 


  1. I found a fun little poem about Toadstool houses that I added to the back of my quilt- 
    (the picture of the quilt back was taken before I inked it in, but I wanted to show the fun batik)


Saturday, February 9, 2019

Challenge 10.3 Bigger Than A Breadbox


The challenge this week for Project Quilting is "Bigger Than A Breadbox"...what?? LOL
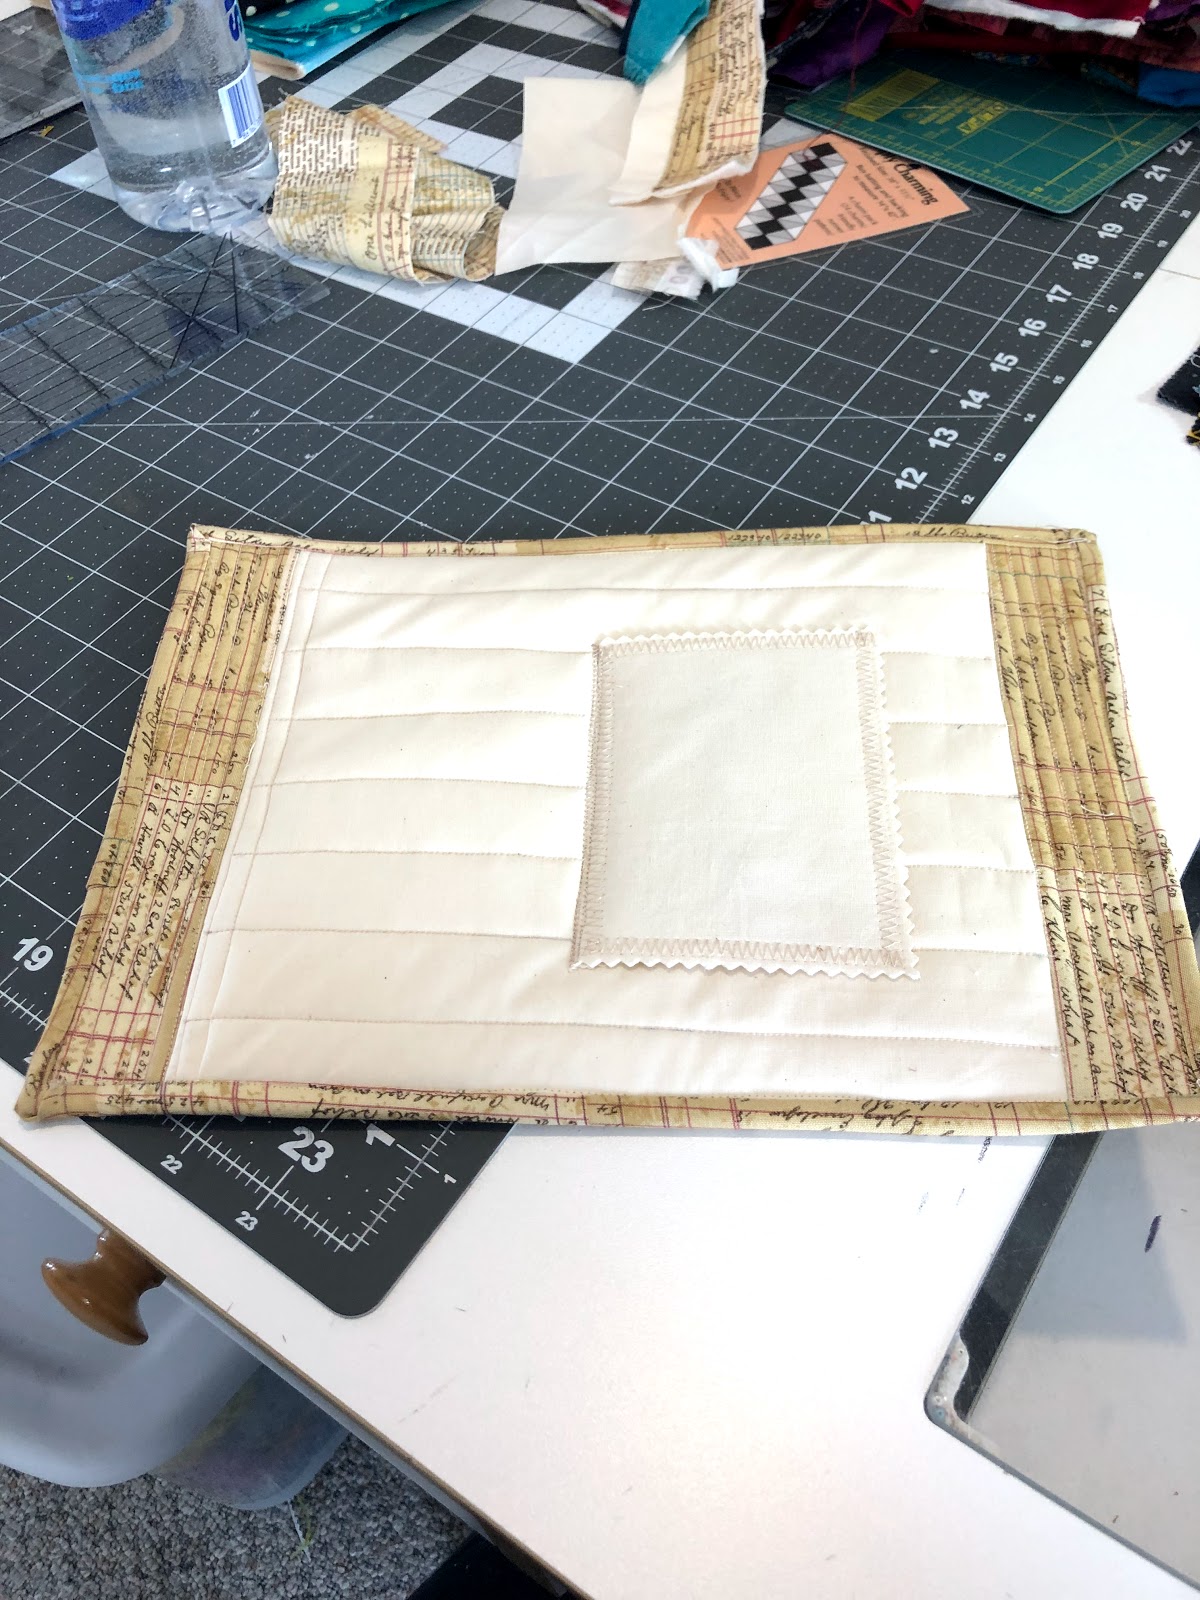
I had a moment of panic when I thought this meant we would have to create a full sized quilt. There was no way I could accomplish that in one weeks time. Then they gave us a minimum size we could use & said it had to be bigger than that. So it had to be larger than 8 x 16 which is apparently the average size of a breadbox. My finished project ended up being 9 x 24 x 3.

When we started Project Quilting this season, my original plan was to create a little book using all the quilts I make for the 6 challenges. When they gave us the size rules, I decided I would use this challenge to create the cover for my "quilt book". On Sunday I started doing research about the saying "Bigger Than a Breadbox", I thought maybe this would give me some creative ideas, because we never had a breadbox, we had a bread drawer! LOL

I found a book titled "Bigger Than a Breadbox" about a young girl who has a magic breadbox that apparently grants wishes that are no bigger than a breadbox. I didn't have time to read a book this week for inspiration, but I did like the idea of something magical.

I also found a band called "Bigger Than A Breadbox" and went online to listen to some of their songs...they were "interesting" to say the least. One song that cracked me up was called Dark, it had lyrics that were pretty "dark" with verses about dark things....black is the color of my true loves soul...dark like my coffee...the reason I wear black is to soak up the light...the song was chanted to the tune of a creepy, old organ in a scary movie. I have a DARK sense of humor so I found it funny, you can listen to it and other gems by "Bigger Than a Breadbox" on YouTube. I liked the idea of something dark, mysterious & a little creepy.

As you know my brain tends to wander, so with a couple of thoughts in my head, I decided that the forest surrounding my quilt shop fit the idea of something a little magical, dark, mysterious & creepy. I had a plan, I would create a book cover that represented the woods next door.


The house where I quilt is Ron's parents old home, it was built the year he was born & sits on the site where another family homesteaded in the early 1900's. There is a little forest of old trees all around the house & down through the draw that separates their house from ours. Some of the big old cottonwood trees & willow trees were probably here before any people lived here, but most of the trees & bushes were planted by the first homesteaders & later the Linn family. Over the years it has become one big tangled bramble of old trees, new trees, dead trees, bushes, tall grass & owls.


There is a family of big horned owls who watch our every move. They have lived in the forest for as long as I have lived here. We love to listen to them in the evening & every once in awhile we will catch them sitting out in the open, or see them silently swoop from tree to tree. Someday I hope to capture them on camera, but they are pretty elusive! They & the other forest birds & creatures give you the sense that something is always watching you in the woods.


When our kids were little they spent hours playing in the woods & on the big sprawling willow trees we call the monkey trees. With the help of their cousins & friends from town they built elaborate little cabins, tree forts & rope swings in the deep dark woods. If I wanted kids out of my hair I knew I could tell them to go play in the trees & they would gladly head out the door. I knew they would end up at Grandma's house at some point where she had a magic cookie jar & real TV. I never worried about them being in any sort of danger, it was only 1/4 mile between grandmas house & ours, what kind of danger could lurk in an area the size of Winnie the Pooh's 100 acre wood? It wasn't until they were all grown up & had kids of their own that I suddenly realized how dangerous those woods could be.


The way is clear,
The light is good,
I have no fear,
Nor no one should
The woods are just trees,
The trees are just wood.
Not need to be afraid there-

There's something in the glade there.....
 (Into the woods lyrics-Stephen Sondheim)

It's funny how as a parent you just say...GO...but with grand kids you change your tune & say NO...it's too dangerous! Rattlesnakes, Spiders & Ticks Oh My!


These beautiful tangled old woods have a way of drawing you in,  I love listening to the wind in the trees while I am working in my garden or quilting in the summer with the windows open. It's fun to walk back through the brambles trying to catch a glimpse of the owls who live in the tall branches. The big old cedar trees are beautiful during the winter months when they are covered with snow. Walking in the woods in the winter reminds me of the verse from the poem 'Stopping by Woods on a Snowy Evening' by Robert Frost...

The woods are lovely, dark and deep,
But I have promises to keep,
And miles to go before I sleep,
And miles to go before I sleep.


The woods are certainly "Bigger Than a Breadbox" :)  Somehow I wanted to capture their beauty, mystery & magic in my little quilt this week.

 On Monday I  dug through my stash and found the perfect fabric, a bundle of Marcia Derse fabrics I  bought last summer. *you can check out her fabric online...AMAZING designs! It has that magical element I wanted to convey in my design.

I have been cleaning my sewing room since January & last week I found some paper piece patterns for pine trees which I had printed a couple of years ago. I decided I would give them a try even though I don't like paper piecing.

A couple of friends & I got together during the polar vortex & did some foundation string quilting, I still had that in my head & thought it would be fun to incorporate some string quilting, I thought this would be a good way to represent the lines of the trees.


Instead of doing paper piecing, since I also wanted to incorporate the string quilting I decided to do foundation piecing. I traced the tree pattern onto a piece of fabric that would fit the guidelines & work as a cover for my quilt book. Then I decided I would make a darker side to my forest & a lighter side, separating the two with  bright yellow strips left over from the yellow challenge we did last season.

Doing foundation piecing was pretty confusing, but I really like the sharp look of the little trees so I am happy I attempted it. I know I will be using this tree pattern again down the road!


On Tuesday after I had the main idea all sewn down, I  just needed to quilt & bind it. I was pretty excited I had the whole thing almost done & it wasn't even Wednesday yet!
I had a box of crafty junk from my cleaning spree I took in on Tuesday afternoon for the art teacher at school, when we were talking about the new challenge for the week. she asked if I was making a box since it was a breadbox challenge....hmmmm....I really hadn't thought of that.

When I got home I looked through my craft supplies, did some measuring, and decided I still had the rest of the week & if I could make it work I would create a little box to attach to my quilt.


I didn't take the seam allowances into consideration so it isn't quite as large as I a planned to make it, but it works & I really like the way it turned out. I used a heavy stiff felt to make the box and then lined it with tag board. I then found what I thought was a magical looking piece of batik and quilted it to the felt, and also created a lining for the rest of the box cover. I didn't think the cover was stiff enough so I found a fusible interfacing and added that to the cover before I sewed the lining on. I then glued and sewed my box to the cover, I love this Fabric-Tac glue, it smells awful, but you can mend jeans with it if you are in a hurry & it doesn't wash out! I did a lot of hand sewing on this project, mainly because I needed to tack the box down to the lining fabric & hand stitching seemed to be the best way to do that, since I was stitching that down I figures I might as well hand sew the binding on too.

To finish the outside of my box I made a button out of a piece of red twig dogwood, and a little latch out of braided raffia. I really wanted a piece of wood from the actual forest next door, but the snow is now over the tops of my boots deep & trudging through it to find the perfect twig is not on my bucket list for the week!


On the inside of the box cover I painted a little owl & added the lyrics to the song "Winter Woods" by  Minnesota folk artist Peter Mayer. (if you ever get a chance to go hear him perform...do it!) 


I also added some little eyes to the circles on the darker fabric...gotta have that creepy element :) 

Even though the woods are a bit creepy, mysterious & dark...they are magical & oh so beautiful. This song says how I feel about them & is the feeling I wanted to create when I made my little box.

I fly sometimes
Through the frozen trees
In the winter woods
In their robes of white
Chanting silently
In the winter woods

Like a forest abbey choir
Whispering hymns of snow and ice
In Excelsis to the cold
And Hosanna to the sky
Hosanna

And holy trees
They know when I'm
In the winter woods
And they bid me to sing
And I comply
In the winter woods

But I stumble in my turn
Because I cannot find the words
In that church of birth and pine
The only word that comes to mind
Is "beautiful"

So quietly
I sing beautiful in the winter woods
And the trees agree
They all agree
In the winter woods
We all agree
In the winter woods

Amen
Amen